Thursday, March 15, 2018

Efficiencies in the Barn

Efficiencies in the Barn

I was born and grew up in New Zealand, where animals eat grass / hay, and live outside year round as a matter of course.

Moving to Canada, it struck me as an incredible amount of work, albeit necessary work, having to move livestock indoors for the better part of 6 months and tend to their every whim.

I was also left with the lingering question over who exactly worked for who on the Canadian farm...

Surely, if we look at the whole animal housing landscape through permaculture lenses, we will discover innovative ways to care for livestock during the winter months. Ways that are energy conservative, lighten the burden on the farmer, and do so with respect to the welfare of the animals.


It turns out that livestock may not need to be housed quite as long as traditionally thought. Cows are capable of finding forage under snow, which means not only less heating costs, but also less feed storage, and the work required to make hay, muck out, etc.
Researchers at the University of Guelph conducted some research on this and came back with some interesting findings. Even though the cattle lost weight over the winter, this is not necessarily a bad thing.

The advantages of putting the cows outside during the day include access to clean air, sunlight, and exercise. These factors influence the efficiency of immune systems, lymphatic systems, and general cardiovascular performance.

Selecting breeds more suited to this kind of lifestyle may reduce the direct output of the herd (in terms of milk etc), however when the overall energy audit of the system is conducted, the reduced output is more than compensated for by the reduced energy inputs.

Another approach to increasing efficiency in the barn is to have the livestock perform work that the farmer would otherwise do with machinery or simple hard labor.

An example of this is what is termed pig aeration. In a typical barn, cow manure builds up during the winter and the compacted mass off manure and bedding must be removed in the spring time.

Pig aeration involves adding more carbon to the bedding than is traditional so that the correct Carbon:Nitrogen ratio (30:1) is achieved for making compost. Corn is intermittently dispersed over the bedding as it build up and it sits there slowly fermenting until spring.

When the cows are moved out, pigs are moved in, and they dig up the compacted bedding in search of the fermented corn which they seem to think is candy. As they turn the bedding, they introduce air, and the composting process accelerates.

By the time the pigs are done, they have put on a significant about of weight, the bedding is nicely composted, easy to extract, and ready to be used for fertiliser.


An Ontario farmer is reportedly using long stem barley for the same purpose. I doubt there is such a thing as a long stem barley, so I suspect that it is in fact a heritage wheat. Anyway, he simply cuts the cereal, bales it, stores it with the heads on, and uses it as required for the bedding. The pigs then go in after the grain and aerate the bedding.

It takes 10 weaners a month to aerate 200 sq feet of bedding that is 3ft thick, and during this time they get no other feed.

A final thought I will leave you with is the possibility of using chickens to turn bedding or compost. Chickens love to scratch, and when they work bedding over, they push it all downhill, rather than in a random fashion as one would assume. They do this even when the floor is only a little off level, which means that they might be a useful cleaning crew in the barn.

Friday, March 9, 2018

Lean Ag Start-Ups

Lean Ag Start-Ups

Is it possible to apply the business models that tech industry embraces in the Silicon Valley start-up community?

What are these models anyway?


Basically, lean start-ups apply a circular process to their venture. 

The process starts with ideas, followed by the act of building results in the form of a product (or service), the performance of which is measured, and the data used to learn various facets about how successful the product is in the market.

The business owner hopefully comes away with some new ideas for improvement, which are then applied and the cycle repeats.

Lean start-ups are also characterized by a "fail fast" ethos, which translated into more meaningful English, means to commit as little energy as possible to investigate the viability of a venture in such a way that it's success or failure can be quickly determined.

But agriculture businesses are typically capital intensive activities. The land is expensive, as is much of the machinery needed to effectively farm the large acreage needed to extract profitability from low margin / high volume commodity products. 

I have previously talked about the option of leasing land, which is a way to drastically reduce capitalization costs and subsequent debt loads.

But I have not yet discussed the issue of machinery and infrastructure costs and how they can be largely mitigated.

If a square meter of land can be utilized in such a way that the productivity is doubled, or even tripled, then the space required to generate a viable agricultural business reduces accordingly. With less land required, less machinery and infrastructure is also necessary.

So how small can you really shrink an operation and yet remain economically viable? You might be surprised to discover that it's smaller then you think...

Curtis Stone started Green City Acres in Kelowna with only $8,000 and turned a profit of $20,000 in his first year.

His business is now generating $100,000 per acre of land due to his lean approach to market gardening.

Curtis uses a system called SPIN (Small Plot INtensive) and applies it to an urban setting where people let him convert their backyards to productive vegetable gardens in return for some of his produce.

He doesn't own the land, and the land comes with infrastructure such as water supply and electricity.

You can follow Curtis on Youtube where he publishes tips, updates, and how-to videos.


Jean-Martin Fortier is another Canadian doing exceptional things with small areas of land.

He also uses an intensive growing system in his market garden and generates revenues similar to Curtis.

Jean-Martin is currently engaged in a very interesting project called La Ferme des Quatre-Temps. This is a project attempting to demonstrate how farms of the future might operate by blending modern technology with models developed from nature.

Jean-Martin is known for his ability to produce industrial quantities of produce without the industrial equipment (and associated price tag).

Friday, February 16, 2018

Seedling Trays for Almost Free


So I have a beef with the folks who make those plastic seedling trays. Around here they cost a little over $5 each and they are about as flimsy as they could possibly be and yet survive the ride home to your place from the store.

They are so flimsy that they tend to crack and split even just washing them, let alone transporting one that's loaded with soil. 

So you're forced to buy two at a time and stack them. Now your seedling flats cost $10 each and even then, a fully loaded one is prone to splitting. 

If I were a cynical person I would tend to think this was all by design...

Since I have 500ft of growing beds to plant out in the spring, there is no way I'm prepared to bankroll one of these crappy manufacturers. There must be a better way I thought. And indeed there is.

Recall those awesome paper pot transplanters you can buy for the low price of $1,000? Well they use paper pots to start the seeds in. And got to wondering what the seedling stage of that system looks like.


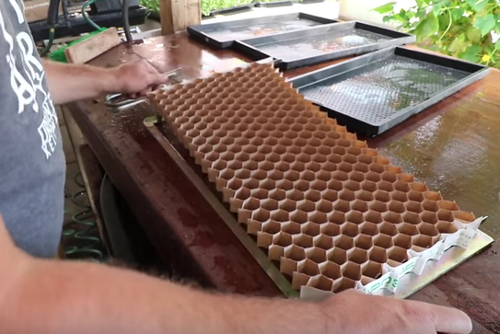
As you can see, the paper pots themselves come in some sort of honeycomb configuration, and this sits in some special plastic tray.

Since I love the concept of taking a seedling in it's own pot and simply popping it into the garden just like the paper pot transplanter, I haven't had a lot of success with paper pots that I made out of newspaper.


Although the seedlings grew OK, they never really took off in the garden and I suspect it had something to do with the newspaper inhibiting root growth (because I dug them up later and had a look to find out why they weren't growing).


They were also a lot of work to make.

Then while I was studying the paper pot transplanter, it occurred to me that the people who invented this amazing device, probably got their inspiration from some sort of low tech system that existed before. But what could that be?

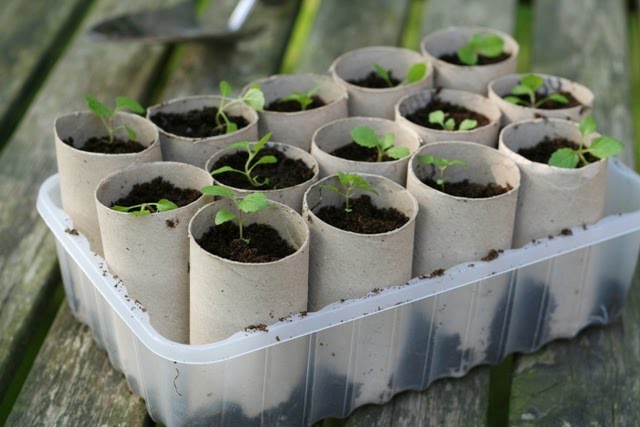
Then I realized that a low tech version of the paper pot transplanter flat looks a lot like a bunch of toilet paper rolls jammed together. Why I hadn't thought of toilet paper rolls before now is a mystery to me, but there they are already formed. And just like the paper pot transplanter pots, they are bottomless so root growth is unobstructed in the garden.

Now a toilet roll is about 4 inches long. But for most seedlings I only really need 2 inches of soil. I measured the depth of a commercial flat to confirm my assumption. So this means that every toilet paper roll produces two seedling pots if I cut it in half.

So I started hoarding toilet paper rolls through the winter. Cutting them in half, and folding them down to minimize the space they were taking up.

In the meantime I got to thinking about these annoying flats...


We do a decent amount of grocery shopping at No Frills, and as a result I need to break down the various cardboard boxes for recycling on a regular basis. 

One evening as I was doing this chore, I noticed that the boxes fruit gets shipped in are particularly difficult to break down because they are made of really sturdy stuff.

"Hey, these would make awesome seed raising flats if only they were waterproof" I thought to myself as I struggled to break them apart.

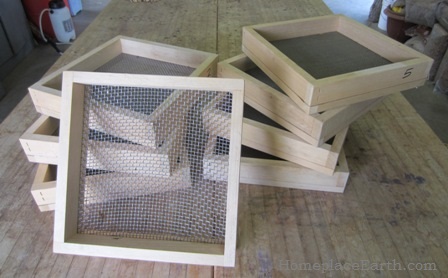
I put one aside anyway because I also realized that they fit my seed screening frames nicely and I have some grains to clean.
Later that week I went to screen the wheat and barley I had harvested in the fall and found that the cardboard flat did indeed work quite well in collecting all the chaff that my screens separated out from the seed. But the cardboard flat had holes in it through which some of the finer chaff would fall and make a mess on the floor.

To fix this, I grabbed a plastic garbage bag and placed the cardboard flat inside. Encased in this plastic film, the flat was now sealed and I could screen my small grains without making a mess all over the place.

It then occurred to me that this plastic encased cardboard flat was also waterproof, and would make an excellent seedling flat for the cost of a plastic bag!

Cardboard flat, toilet rolls, and a plastic bag. I don't think it could be more low-tech than that.


Thursday, February 15, 2018

Permaculture Seed Raising Mix

This post is a follow on from my Thoughts on Growing Seedlings for Transplant. 

In this post, I'll talk about making my seed raising mix with the focus being on the life within this growing media as opposed to the typical focus on moisture and nutrients.


My partners in this exercise will be these guys. Composting worms.

Vermicompost, or worm castings are packed full of living organisms and organic exudates which absorb and regulate moisture within the soil. It also happens to be a nutrient dense medium which means that it's a perfect candidate for a base ingredient in a permaculture seed raising mix.

I already have a vermicomposting system, and a ready (and free) source of high quality vermicompost. I recommend you keep your own composting worms too. Not only are they low maintenance, but you have complete control over what goes in (and eventually comes out) of your system.


The first task in making this seed raising mix is to screen the finished vermicompost. It's loaded with seeds from melons, squash, apples, pears, and the odd banana sticker. So they all need to go.

I used a mesh trash can from the dollar store to do this and it worked incredibly well.


The next step is to assemble the ingredients:

  • Screened Worm Castings
  • Coconut Coir
  • Perlite
  • Vermiculite
I decided to use coconut coir as a replacement medium for peat because it's a renewable resource. It tends to have a few chunks and long fibers in there, but they can be picked out easily as you find them. The coconut coir acts as a binding agent and moisture absorbent.

The perlite adds a lot of microscopic surface area for the living organisms to colonize, and it also helps regulate moisture levels.

The vermiculite acts similarly to perlite, but it also introduces trace minerals into the mix. However vermiculite has better water holding capacity than perlite, while perlite has better aeration properties than vermiculite.

Finally, vermiculite is a much better buffering agent than perlite, and acts as a pH stabilizing influence in the mix.

The next step is to combine the ingredients:

  • 4 Parts Worm Castings
  • 2 Parts Coconut Coir
  • 1 Part Perlite
  • 1 Part Vermiculite
I was initially taken aback by the cost of the coconut coir. But when I went to measure it out, I found that is comes highly compressed, and it expands a lot so you need a lot less than you think you do.

I chose the ratios printed here for a number of reasons. Typical seed raising mixes that incorporate vermicompost use a lot less of it. However, these mixes are based on traditional paradigms which focus on sterility, air, water, and nutrients. This mix focuses on soil life.

I noticed while doing research online that there are a lot of mixed signals regarding worm castings. A lot of it has to do with people incorrectly assuming that because it looks like soil, it can be treated like soil. This is not the case at all. It absorbs a lot of water. It is incredibly sticky (from the bio-exudates), gooey, and unless you have worms actively turning and aerating it, it will set like concrete.

During my research, I stumbled across this article on growjourney:

A lot of what they were advocating fell in line with my objectives, so I stole their recipe. Thanks guys!


The final step involves mixing it all together. You can see coconut coir chunks in there still, but overall it looks pretty much like the usual seed raising mix you buy, if a little heavy on the perlite by comparison.


Overall, I am optimistic for my seedlings. I know exactly what's in this mix, and because I make the worm castings for free, this will probably work out cheaper than buying high quality commercial product.

Thoughts on Growing Seedlings for Transplant


This year I am experimenting with a growing system that departs from my ongoing efforts with direct seeded crops, and this means that germinating seeds indoors and transplanting them out in the spring.

This got me thinking about how a permaculturist would approach this exercise considering that the typical gardener takes a sterile seed raising mix, puts it into one-shot plastic seed raising formers / trays, and plants their seeds into this.

This is all in an effort to avoid mold and a condition called "damping off" where young healthy seedlings all of a suddenly keel over and die.

But here's the thing. These seed raising mixes contain a lot of peat which as you hopefully already know is not a renewable resource. They essentially strip mine these deposits with machines that look like giant vacuum cleaners. Peat is also acidic.

Commercial seed raising mix also contains "special ingredients" that the manufacturer puts in to make their product better than the others. And since "special ingredients" often tends to be described as toxic gick depending on your point of view, I chose to make my own permaculture seed raising mix this year. 


Since I am also lazy and tight, I decided to not buy these plastic seed trays to raise my seeds. I found that they always split (by design?) and even though theoretically you can reuse them, in reality this isn't the case.

Pulling the seedlings out of these trays and 
gently placing them into the garden beds seems like a lot of tedious w-w-work to me too.

So what is a permaculture seed raising mix then and how is it different from the stuff you buy at Canadian Tire?

Well for starters, a sterile environment is really the antithesis of what permaculture is all about. I strongly suspect that the reason seed raising mix is sterilized is because the pre-sterilized mix is biologically so far out of balance that the cheapest and easiest way to address this is to nuke it.

Shouldn't plants be born into a rich ecosystem containing fungi, bacteria, and all sorts of living things we haven't even classified yet? Since stability arises out of complexity within natural systems, shouldn't we be seeking to make our seed raising mix as far from sterile as is humanly possible? Is it possible that the issues gardeners experience in raising seedlings comes from their growing media not being complex enough?

Friday, February 2, 2018

Perennial Forage Crops for the North

Perennial Forage Crops for the North

It is not widely known that the cattle we are familiar with in our part of the world originated in the forests and swamps of Northern Europe.

During the warm summer months, they would spend their time in the swamps, keeping cool, and grazing on the grasses and aquatic plants, much in the same way as moose do here in these parts today.
When winter descended, the cattle would move into the sheltered forests and survive through the winter by foraging on the undergrowth, and lower branches of trees.


Tree hay is a term used for the practice of pruning trees in July, when nutrients are high, and stored until winter when it is fed to livestock. 

The animals strip the leaves, tips, and bark from the tree hay and it provides a mineral rich alternative to standard hay made from grasses.
 Notice in this video that they are using standard coppice tree species, which means that the tree will grow back vigorously. A multi-functional aspect of this technique is that the animals process the wood so that the end product is suitable as fuel for a rocket mass heater.

Pines (so long as you don't plan on butchering the animal shortly after as it imparts an unpleasant flavour), Alder, Poplar (except black poplar), Silver Birch, Linden, willow, mulberry, elder.

Gorse has historically been used as a highly nutritious animal fodder which is preferred by livestock. It is cut right to the ground once every 2 years, with the top of the plant used for fodder, and the rest for animal bedding and fire wood. 


Be aware that wilted maple and cherry leaves contain toxins that are harmful to animals, however fresh and dried are fine.

Tuesday, November 15, 2016

What They Forgot To Tell You About Compost


I have noticed that soil microbes tend to take longer to do stuff in the far North. Maybe it's because for 6 months of the year they are locked in ice. Maybe there is something in the soil itself - I don't know. But I do know that it takes longer than it should to make compost.

I find this odd, because I've also noticed that my wooden fences and growing frames break down faster here than in other places where I have grown things. This is likely due to the increased role mycelium fulfill in this climate, which is a topic for another day.

So this compost business. Why does it take so long, and what is the dirty little secret i discovered recently?

Every fall, I build a pile of compost approximately 2 cubic meters by volume.

That's about enough to fill this little dumpster.

But with sustained temperatures of around -15C for months at a time, the pile freezes solid.

To prevent this happening, one has to either:

  1. Make a much bigger pile.
  2. Insulate the pile.
Last fall I decided to add composting worms to my pile. My intention being that they would accelerate the composting process and improve the overall quality of the finished product. And if they survived the winter then I know that the pile didn't completely freeze since composting worms die at around 4 degrees Celsius.

I built the pile as usual, wrapped in with corrugated cardboard, and then covered it with a tarp, allowing some gaps for air exchange.

When spring came, I still had worms and there was a slight improvement in the composting process. However, over the summer months, this pile really broke down into excellent compost so I think the worms made a big difference in the long run.

Zucchini as an Indicator Plant

Did you know that Zucchini love growing in active compost? Well they do. Growing up off the ground, and being embedded into what is essentially a giant sponge is something that they really like. The heat given off by the pile also protects the young plants from late spring frosts.

So I unwrapped my compost pile in the spring, planted my zucchini seedlings in the top, and placed some mulch around the plants for all the reasons why you should use mulch in your garden. 

Everything went awesome until the plants started to fruit, and I noticed end rot developing. 
This is what end rot looks like, and it is an indicator of a Calcium deficiency in your soil.

But wait. This can't be happening. Compost is awesome! it provides everything your plants could ever need and more because, well, it's compost!

Well, it turns out I am not the only person who has a Calcium deficiency in my compost.

Do I still compost? Yes I do because my soil is very deficient in organic matter. And thanks to my indicator zucchini, I have amended my compost pile with lime for when I incorporate it into my garden beds in the spring.