Monday, July 30, 2018

Air Layering - The New Awesomeness

Air Layering - The New Awesomeness

The trees are maturing around the border of my kitchen garden. And they are shading out my grow beds.

I have a choice - cut them down or start transitioning the space to a more mature, perennial based food production system.


Since the most shaded beds run along the transition zone between urban savanna and urban forest, I decided that transition perennials like low shrubs would be a suitable place to start.

The fastest way to establish this food system is to take a trip to the local nursery with a credit card. In my case, someone else's credit card...

Alternatively, I could take my time and start with seedlings or cuttings that I can obtain for free or barter. And that's what I'm doing.

So I got to reading and researching not only for local plant material donors who are acclimatized to the Northern environment, but to also learn techniques for cloning and propagation. And I just discovered this technique called air layering which I think is just awesome. Expect to see plastic bags on tree branches everywhere!

So What is Air Layering?

Here is a basic video introducing the concept:


There are two main techniques involved. One is ringing the branch as shown in the video above, while the other involved cutting a notch like in the video below:

Some people just make longitudinal cuts along the branch and it seems to work. The point is that it's not a precise science. Whatever works best for you works best!

Sphagnum moss seems to be the most common packing medium, but coco coir works equally well.

Instead of using rooting hormone, I'm experimenting with willow water I made at home to see how well it works.


Tuesday, July 17, 2018

Growing Seabuckthorn from Seed

Growing Seabuckthorn from Seed

Last fall I became aware of some seabuckthorn bushes growing on the Lakehead University campus grounds.

Apparently they had been planted on the lower edge of a car parking area to help control erosion, and because seabuckthorn is salt tolerant, they were likely to survive the spring runoff.

Not only have they survived, but they're thriving in their position.


Here is a street view image of the bushes and I have circled them in red. If you look closely you can just make out the distinctive berries!

Some time back, I showcased seabuckthorn in a plant of the weekish post. The most common way to propagate the plant is via cuttings. But it was late fall, and so I decided to see if these plants were producing viable seed.

So one evening, in the freezing drizzle I stopped by and picked some berries. We had been experiencing hard nighttime frosts and warm days, so the berries were extremely ripe and mushy.

I put the into a plastic bag, and then drove home still covered in the powerful smelling juice that lingered in my car for days. Since I'm looking for genetic diversity, I made sure I collected berries from as many different bushes as possible.

Once home, I mashed up the berries and separated the seeds. It was a pretty easy job as the seeds have a waxy coating similar to flax seeds, and they slip out of the fleshy sheath they reside in.

I then counted out 150 seeds and soaked them for 48 hours, during which time almost all the seeds had sunk to the bottom. The few that remained floating I discarded as per the literature I could find (the floating seeds are apparently not viable).


I then placed the seeds into a plastic bag with some wet perlite, and placed them into the refrigerator for 3 months...


Next, I removed the plastic bag from the cold store, and placed it in a sunny position since the seeds require exposure to light for germination.

If all goes well, the seeds should begin sprouting with a week or two.

5 days later and I spotted the first germinated seed, and the day after that I potted the first 4 seedlings.

Despite my initial optimism, these 4 seedlings were the only ones to germinate from the 150 seed sample. And to add insult to injury, the 4 seedlings all died within a few weeks of germination.

So this experiment was a total bust folks. Was it the way I stratified and propagate them? Maybe. But I think that my next adventure in Seabuckthorn propagation will be harvesting the abundant suckers that are popping up.

Thursday, July 12, 2018

Domestic Vermicomposting


Domestic Vermicomposting

A few years ago I started vermicomposting and only just now realized that I never wrote about it, so here we are.

I wanted to have compost worms, and I needed a system that would operate all year round even when it was 20 below outside.

This meant a system that was capable of being moved indoors during the winter months. And that meant a clean and odor free system.

After some research I arrived at a stacking 5 gallon pail system like in the video below:


That worked for a few months and then I discovered some fatal flaws in the system advocated in that video. The weight of the worms and bedding and castings forced the pails into each other to the point that I couldn't get them apart when the lower one became full of leachate. I eventually did separate them, but it was a huge stinking mess. I also found that there was not enough air getting into the composting chamber and things were getting a little anaerobic.

My solution was to drill a lot more holes not only in the bottom of the pails, but in the sides as well. That fixed the smell issue, but it introduced a new problem. When I cleaned out the system, I couldn't line up all the holes again so that the airflow was maintained.

After a lot of trial and error I present to you MkIII of my worm tower. It is dialed in and problem free.

The system uses 5 pails. Two of these are actual composting compartments (one for active composting and the other for finishing off), but you can add more as desired.
One pail (the bottom one) is the sump which collects leachate, and I have a spigot (a tap) mounted in the bottom so I can drain it off without disassembling the system. This is a huge improvement.

I also added a sighting tube to the sump, and drew a line around the outside with a permanent marker at the point where the bottom of the upper pail is positioned. This means I can tell at a glance if the sump needs emptying. It is another huge improvement and it prevents stinky leakage / overflows.
Two of the pails are used as spacers. This prevents the pails from jamming together when there is weight in them. 

A spacer is made by cutting the bottom of a pail off like shown in the image on the left.

A spacer goes between every composting pail you have in the system, and also between the lowest composting pail and the sump.
Once all the pails are stacked together in order, I then drilled the breathing holes so that there is a clear path for air to travel into the composting chambers through multiple pail sides. 

Since these pails stack inside each other, the hole has to pass through the wall of two pails, and also a spacer depending on where the hole is.
I then drilled some larger holes that will be used to align and lock the pails together. In the image, you can see I use a piece of scrap coaxial cable for the job, but it can be anything really. 

The important thing to note here is that the two holes are bigger than the ventilation holes so they can be easily identified during reassembly.

Since these holes go all the way through the pails, alignment and reassembly is simple.

The locking mechanism also prevents the pails from separating when you go to move the system, since we now have these spacers that prevent the pails from fusing together. If you don't have the locking pins, then the pails will separate during transport and make a huge mess.

It's probably worth mentioning that these locking pins are installed at every spacer, and there are two locking pins per spacer - on opposite sides from each other.

When it comes time for cleaning and removing castings, simply remove the locking pins and everything lifts out. It's as simple as that!

Cider Time - Crushing

Cider Time - Crushing

Fall means apples, and apples mean apple juice.

Our primary use of apple juice around here is apple cider vinegar (ACV) due to its many uses and health giving qualities.

To make ACV, a good starting point is apple cider. And to make apple cider, you need apple juice.

And of course, if you need apple juice then you need some equipment...


I spend a lot of time scouring the internet for solutions to extracting apple juice from apples that is both economical and efficient.

During this search, I found the Whizbang Cider system that involves the use of a garbage disposal unit to turn apples into pulp.

There are lots of videos on Youtube showing how a continuous use garbage disposal unit is a great solution for grinding apples. But they cost about $200 to purchase new, so I went to the restore and bought a standard second hand disposal for $20 and gave it a thorough clean.

I found an old solid oak coffee table at a second hand store for $20, and so I bought that and cut a hole in it so I could mount the disposal unit into.

I did not modify the disposal unit, and it did get hot. I found that if I pulped only enough apples at one time to fill the press then the grinder had just enough time to cool while I processed the juice. If I was going to be processing more than 5 gallons of juice, then I would seriously consider investing in an upgrade. But for $50 I'm personally OK with doing things a little bit slower.

Mycelium in the Garden - Part 1 Update 1


Mycelium in the Garden - Part 1 Update 1

It's been roughly 3 weeks since the first mycelium in the garden experiment was conducted.

In Part 1 of this series, I show how the experiment using newspaper, hay, and oyster mushroom substrate was used as a sheet mulch to see how the introduction of mycelium might enhance the biodiversity in the garden.

So yesterday I pushed back the hay in a few spots to see if anything was happening. In the image below, you can clearly see that the newspaper is starting to become less distinguishable as newspaper. What might be more difficult to see is that the reason why this is happening is because of a white growth beginning on the surface. That would be mycelium establishing itself. Yay!

An even keener eye may spot the odd green patch on the newspaper. This is seed from the hay that has germinated and is growing. This was expected. Stay tuned to see if it turns into pasture.

The next photo shows a different area I uncovered at random. You can see the grass seedlings much better in this shot, and you can also see that the mycelium are colonizing the newspaper much faster. You might also be able to spot white patches on the hay, which means that the mycelium are advancing into the upper mulch layer.


So far so good. Stay tuned for more updates!

Tuesday, July 10, 2018

Mycelium in the Garden - Part 2


Mycelium in the Garden - Part 2

In part 1 of this series, I talked about my intentions for introducing mycelium into the garden and documented the first experiment which involved newspaper, used coffee grounds, and hay (not straw) in a shady spot in the garden.


In this post, I'm going to talk about my second experiment. This one involves utilizing the space beneath my bean and pea frames which gets too shady to grow much of anything as the summer advances.

This experiment will be making use of newspaper, used coffee grounds, and straw (not hay) as I want to see if there really is a difference between the two mulches.
The space under the climbing frame has grown thick with weeds, so I simply piled the newspaper over the top of them. 

I did pull a few of the weeds from around the newspaper edges, and stuffed them under to make it look neat and tidy.

Once I had a good thick layer of newspaper down, I covered it with 15 gallons of used coffee grounds. This is much thicker than with the first experiment, and I decided to do this after taking a peak under the mulch in experiment 1, and saw the mycelium really infiltrating the coffee grounds, and to my surprise, no mold!

Next I sliced the used mushroom log into disks and placed them directly on top of the used coffee grounds just like in the previous experiment.

Next, I covered the disks with a single sheet of newspaper just to help with moisture retention and wet it down so it would stay put while I collected the straw.
Finally, I covered everything with a generous layer of straw, being careful to ensure that there was no newspaper sticking out.
So that's it! Now all there is to do is sit back, let the peas grow, and see if the mycelium processes all that used coffee grounds before the freeze comes.

Tuesday, June 26, 2018

Mycelium in the Garden - Part 1


Mycelium in the Garden - Part 1

Gardeners often freak out when they see toadstools growing in their garden.

But it doesn't have to be that way. In fact, if we replace "toadstools" with edible mushrooms then we have created another stream of productivity while at the same time fill a decomposition function within the landscape.

This post is about my experiments with mycelium not just as a source of tasty mushrooms, but as a decomposition accelerator in my sheet mulching system.

But doesn't accelerating sheet mulch decomposition mean you have to replace it more often I hear you ask? Well, yes it does. But the reason I sheet mulch is keep plant competition down, regulate soil moisture, and encourage soil biodiversity.

I actually want my soil to eat the sheet mulch and incorporate all those nutrients and organic matter into the humus. Since my sheet mulch contains a lot of woody material it makes sense that a wood eating organism will do the job for me.

I started with a used straw log that commercial mushroom growers use to grow primary decomposers like oyster mushrooms in. I could have used spawn, or a slurry, but this is what I had available to me locally.

Since the log contained oyster mushroom mycelium, I decided to incorporate used coffee grounds into the sheet mulch bed. I collected a week's worth of used coffee grounds from a local coffee shop and stored them in sealed 5 gallon pails to prevent molding.

The 4ft wide garden bed I was working with had about 6ft of available space. It had some old newspaper and straw from last season on top of the soil, and I spread out the 15 gallons of used coffee grounds as my base layer directly on top.


Next, I cut the plastic off the straw log, and sliced it up into disks about 2 inches thick. These I placed on top of the coffee grounds as shown in the images below:
After this, I layered newspaper over the top of the disks and gave it a good watering:
Finally, I covered everything up with a deep layer of hay and gave it a final watering.
Stay tuned to see how this experiment in active sheet mulching turns out! 

Monday, June 18, 2018

High Productivity in Dry Conditions - Part 2


High Productivity in Dry Conditions - Part 2

In part 1 of this blog post series, I talked about a design for growing water hungry plants in dry conditions.


In this post, I thought I would share my experience installing some of these in my own garden to see how they go.

My garden beds are 48'' wide double-reach beds, so a 48'' diameter circle bed was the natural choice for this project.

I chose an area that has not been touched this season, and was overgrown with horsetail, chickweed, lambs quarters, and grass.

I started by digging a hole in the middle of the garden bed, and building up a doughnut shape of soil. I pulled the biggest plants out and left the rest in there as you can see from the photo to the right.

It was a rough as guts installation, and took less than 5 minutes. I then scrunched up the plants I pulled previously, and stuffed them into the bottom of the hole.


I patted the soil and shaped it a bit to make sure I had a solid ring into which I will plant the seedlings later.


After that, I took some garden debris from last year and filled the hole with it.

The next step was to cover the entire thing in newspaper. Each placement you see in the photo is approximately 6 sheets of newspaper thick, and I started at the base and worked my way into the center, making sure there was a good overlap.

This will act to keep moisture in the soil, and prevent any unwanted plants taking over.


I also made sure there was a ready pathway for water to enter through in the center of the circle.


I watered the paper down to make it all stick together, and topped it off with some semi-finished compost.


Finally, I covered the entire thing with a thick blanket of old straw and gave it a good watering.
I made two more of these. One that used hay instead of straw to see if it really makes that much of a difference.
And the final one is positioned under a tree where it receives lots of sun but very little water. 

In fact, it is so dry, and the soil so sandy, that I couldn't really form a decent doughnut shape because the soil wouldn't stay in place.
This spot barely grows anything except the odd dandelion and some grass. It's a very difficult corner of the garden and so it will be a great test location for the circle garden.

Thursday, June 14, 2018

High Productivity in Dry Conditions


High Productivity in Dry Conditions

The spring of 2018 has turned out to be unusually dry, and it's now pretty safe to say that the spring rains never came.

It was also an unusually cold start to spring which delayed everything by a few weeks.

The long term climate forecast models used for things like commodities markets, launching rockets into space, and other critical sectors of human activity are pointing to a continuation of the global cooling trend that has been in place for the past decade or so.

The geopolitical implications of this, should it come to fruition, isn't the topic for today. Rather, I thought it would be good to write about some techniques that can be employed in the garden if this exceptional dryness becomes the norm.

Hopefully by now everyone should be aware of the benefits of mulching and how it reduces the need for watering by a factor of 10. Direct seeding in a mulched garden bed can be a challenge which means that more often than not a mulched garden bed also means seedling transplants.

But let's focus on mulching systems as a means to conserve water and hold nutrients within the system longer.

The image to the right is a banana circle. It is a mulching system used in the tropics for the production of bananas, and it has been reported to produce 100 times more bananas per square meter than the traditional plantation method.

Pretty much every permaculturist knows what one of these are and how it's constructed so I'm not going into the details here.

But what if we can adapt the principles of a banana circle and apply them to the great white North?

The system is constructed by building a doughnut shape with your soil into which you will plant your crops. The middle of the doughnut is then filled with coarse unfinished compost / mulch and then the whole thing is covered in a thick layer of straw or hay.
Converting a 15 foot long double reach bed will yield roughly 50 square feet of growing space as illustrated above. I employ double reach beds in my garden, and find that 3 rows in the bed are manageable. 

This method delivers the same amount of growing space as I usually have, and there is the added bonus that I'm utilizing the center areas to finish off my compost from the year before. I have essentially stacked two functions into a space that I'm currently using to perform just one.

When you go to water the bed, you simply pour the water into the center area and let it wick into the growing bed from the center. No drip irrigation or sprinklers required. Just dump the water in there!

This system is suitable for water hungry plants like squash, melons, tomatoes, peas, beans etc.

Read Part 2 to follow my implementation of this concept.

Monday, March 26, 2018

Siberian Pines - Part 2: Seed Stratification

Siberian Pines - Part 2: Seed Stratification

In Part 1 of the Siberian Pine series, I wrote about Pinus Sibirica and its value within the Northern permaculture ecosystem.

In this installment I will be writing about how I prepared the seeds for germination.

If you spend any time on the internet looking for information about growing pine nut trees, you will quickly discover that many of these species require some form of cold stratification to mature the seed kernels and trigger germination.

If you research stratification for Pinus Sibirica in particular, you are likely to find all sorts of weird, wonderful, and often conflicting information about how to do this.

So I decided to document the process I followed, in the hope that others may benefit from my success or failure.


I received 200 seeds in the middle of March.

I had contacted the supplier with some concerns that there would not be enough cold stratification time to be able to plant the seedlings in June. They informed me that from their experience only 1 month of cold stratification is needed, and they usually don't even bother with that. Without any seed treatment the supplier reported they get roughly a 50% germination rate.

The seeds came with instructions about how to cold stratify them, but they were a little vague, and of course conflicted with the other online info.


My conclusion from this research is that the cold stratification protocol is a reasonably flexible one, and it usually starts with soaking the seeds, which I did using filtered water. I also decided to ignore the warm stratification advocated by the likes of Rhora's because the majority of stratification protocols I found for Pinus Sibirica did not mention it.

During my research I read something about the seeds that sink during the soaking process being more viable than the seeds that float. I also immediately noticed that when I poured the seeds into the water, they all floated. Not a great start...

My research also suggested soaking times ranging from hours to days. I decided to soak them for 8 hours and see how things progressed.

8 hours later maybe 5 seeds had sunk to the bottom of the container, and the water was stained brown from the pine residue / resin. So I drained the water off, let the seeds sit for half an hour or so, and then put them back on to soak overnight in fresh water.
The next morning a few more had sunk, and so I repeated the process from the day before - letting them sit for half an hour, and then soaking them in fresh clean water for another 8 to 12 hours. 

My thinking around the seeds sinking is that as the seed coating absorbs water and it infiltrates the seed, the seed becomes heavier, and therefore sinks. Seeds that don't absorb water probably stay dormant which is why there is a lower germination rate. Anyway, time will tell and we shall see...
36 hours after putting the seeds into soak and roughly half of my seeds have sunk to the bottom of the container. It's beginning to appear that all the floating seeds at the beginning was a false alarm.

3 days soaking in water, and changing it every 8-12 hours and my seeds are ready for cold stratification. 156 seeds had sunk to the bottom, leaving 44 floaters which is roughly 25%.

I chose perlite to stratify the seeds in simply because I happen to have some handy.


I decided to perform two different cold stratification protocols to see which one is better. And I kept the floating seeds separate from the sunken seeds to see if they responded differently.

The first one will be my control, where half the seeds are placed in a plastic bag with vermiculite and simply placed in the refrigerator for 10 weeks.

The remaining seeds were placed in a different bag containing vermiculite, and will be subjected to the following:
  • 2 weeks in the refrigerator 
  • 2 weeks in the freezer
  • 4 weeks alternating between the refrigerator and freezer every other day
  • 2 weeks in the refrigerator 

What I am attempting to do is replicate the freeze / thaw cycle that these seeds would naturally experience as spring arrives. Anyone who has made maple syrup knows that this time of the year is when the first signs of life get kicked into gear as the phase transition cycle drives the sap out of the roots and into the upper branches of the trees.

This phase transition cycle of water inside the seed will also create a slow pulsing pressure upon the outer shell from the inside. As the moisture inside the seed freezes, it expands pushing out upon the seed casing. Then as it thaws it contracts, releasing the pressure, and drawing a little more moisture into the seed via capillary action. As this cycle repeats, I think that it will weaken the tough outer casing so that the seedling may successfully emerge.

This research study from 1925 on white pine seeds indicates that this protocol might indeed prove effective at increasing germination rates.

Wednesday, March 21, 2018

Siberian Pines

Siberian Pines

This year I decided it was time to grow some pine nut trees. But there is a challenge involved in growing these delicious nuts in the North. The pine nuts we know that are used in things like pesto, do not grow in our climate and is more suited to the Mediterranean and North Africa.

But there are alternatives, and they all happen to be very close relatives of White Pine. For example the Swiss Stone Pine, the Korean Pine, and the Siberian Pine.

I decided on the Siberian pine (Pinus Sibirica) or Russian Cedar for a number of reasons.

Firstly, their native habitat is the boreal forest (called the taiga) and so both the climate, soil, and ecosystem is very close to Northern Ontario.


Secondly, these trees produce thin shelled pine nuts which makes them easier to process.

And finally, Pinus Sibirica seeds are easier to germinate than the notoriously difficult Korean Pine.

But before I get into my experience raising these trees, let me explain why I think they are a great addition to a Northern permaculture landscape.

These trees are big. Like 100 ft tall at maturity big. Not a lot of trees around here do that, and so they will likely make great shelter barriers from the cold winter winds; creating small warm micro-climates in the landscape.

The Economics

These trees live for about 800 years although the typical forest age currently is around 400 years. 

Each tree produces on average 5 Kg of pine nuts every year (up to 10 Kg in a mast year). 
At the current price of $75 per Kg, a tree can produce an annual income of $350 per tree once you factor in squirrels, "processing slippage", and the odd bad year.

Now consider a shelter belt of 100 trees and let the math sink in. That is a $35,000 per year income for maybe 1 month worth of work harvesting and processing. Every year for 500 years (Allowing for old age retirement, tree losses due to disease, fire and natural attrition).

That is an income lasting half a dozen lifetimes, or a dozen generations. Such a shelter belt would have the potential to generate $17.5 million in pine nuts alone. Not to mention the other benefits these trees have in the ecosystem.

OK enough of the boring numbers. Needless to say, these trees pay the bills.
The tree is seriously hardy. It even grows in permafrost. And its resin doesn't crystallize quickly as common pines do. In its native land, this resin is a natural resource useful for many different applications that I won't go into here.


The Nuts n' Bolts

Pine nuts are generally ready for harvest about 10 days before the green cones begin to open. And in the case of Pinus Sibirica, the cones never actually open which makes determining ripeness difficult. 

In its native habitat there is a bird called a spotted nutcracker is responsible for extracting the nuts from the cone and dispersing them. The spotted nutcracker doesn't live in North America, but the Clarke's nutcracker does. It may be a good indicator species for nut ripeness but alas, they don't range into Northern Ontario.


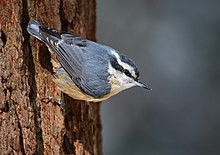
This little guy is a Red Breasted Nuthatch, and they do migrate into Northern Ontario. They also happen to be great eaters of conifer seeds. Maybe, just maybe a flock of these descending upon your pine nut trees to feast could be subtle sign that it's time to harvest.


Another possible indicator bird is the Pine Grosbeak.

The cones are harvested with either long poles (often bamboo), long-handled pruners, or long-handled saws which knock the cones down.

The harvested cones are placed in a breathable bag and then exposed to heat / left in a sunny, sheltered position for 3 weeks. The drying process causes the cone to fully ripen, and at this point they can be broken apart to extract the seeds. This is generally done with a mechanical threshing machine to save time and labor.

Now I'm wondering if these little guys might be eager workers we can recruit to harvest the pine cones. They naturally chew through pine cone stems to detach them from the tree. They then collect the fallen pine cones and stash them away in a safe spot for future use.

It will be an interesting experiment to see if they will harvest and store pine cones if they are provided with a convenient storage space, and the cones they collect are replaced with another food source, like peanuts in the shell.